Imagine a vibrant bell pepper, roasted to tender perfection, overflowing with a rich, savory chili, and crowned with a blanket of gooey, melted cheese. This isn't just a meal; it's a comforting experience, a culinary hug that satisfies on every level. Our Cheesy Chili Stuffed Peppers: A Family Favorite Dinner Recipe brings together the best of hearty chili with the sweet earthiness of bell peppers, creating a dish that’s both rustic and refined. What makes this particular chili stuffed peppers recipe truly exceptional, however, isn't just its incredible flavor, but its remarkable adaptability. Whether you're planning for a busy weeknight or preparing for future meals, these peppers are wonderfully make-ahead and freezer-friendly, transforming a delicious dinner into a smart kitchen strategy.
The idea of stuffing peppers with chili might sound simple, but its origins often come from a place of resourceful creativity. As Verna Redman of Dade City, Florida, fondly recalls, "My family loves chili, so I decided to try stuffing green peppers with it. They tasted great and are good made with leftover chili, too." This sentiment echoes in many homes, where a hearty batch of chili finds a second life, elevated into a brand new, spectacular dish. It's an ingenious way to combine two beloved comfort foods, proving that some of the most memorable meals are born from simple ingredients and a dash of inspiration.
Why This Chili Stuffed Peppers Recipe Will Become Your New Favorite
This isn't just another dinner idea; it's a culinary revelation that combines convenience with unparalleled flavor. Here's why our chili stuffed peppers recipe deserves a permanent spot in your meal rotation:
- Unforgettable Flavor Profile: The magic truly happens when the sweetness of the roasted bell peppers meets the robust, spiced notes of the chili filling. Each bite offers a harmonious blend of textures and tastes, from the tender pepper to the savory chili and the luscious melted cheese on top. It’s deeply satisfying without being overly heavy.
- Hearty & Wholesome: Packed with protein and vegetables, these chili stuffed peppers offer a balanced meal that will keep you feeling full and satisfied. It's a fantastic way to sneak extra veggies into your family's diet.
- Highly Customizable: While our base chili stuffed peppers recipe is a winner, it's also incredibly versatile. You can easily adapt the chili filling to suit your dietary preferences or what you have on hand. Whether you prefer a meaty, vegetarian, or even a spicy kick, this recipe can be tailored just for you.
- Make-Ahead Marvel: For those who love to plan, this recipe is a dream. You can prepare various components in advance, or even assemble the entire dish hours before baking, making mealtime stress-free.
- Freezer-Friendly lifesaver: This is where these peppers truly shine for busy individuals and families. Batch cook a larger quantity, and freeze portions for quick, nutritious meals down the line. It's a delicious solution to those "what's for dinner?" dilemmas.
Crafting the Perfect Chili Stuffed Peppers: A Step-by-Step Guide
Creating these delightful chili stuffed peppers is a straightforward process, built on layers of flavor and simple techniques. This recipe yields a generous batch, perfect for a family dinner with potential for delicious leftovers, or for stocking your freezer.
The Bell Peppers – Your Edible Bowls
The foundation of this dish is the bell pepper itself. Choose your peppers wisely, as their color and sweetness will impact the final taste profile.
- Selection: Opt for 6 large bell peppers. While green bell peppers are traditional and offer a slightly bitter, earthy contrast, a mix of red, yellow, and orange peppers makes for a visually appealing dish and introduces a sweeter, fruitier note. Red, yellow, and orange peppers generally have higher sugar content than green ones.
- Preparation: Carefully slice each bell pepper in half lengthwise, from stem to base. Gently remove the seeds and any white membranes. A small paring knife or spoon works well for this.
- Pre-Seasoning: Arrange the pepper halves cut-side up in a large baking dish. Drizzle with 1 tablespoon olive oil and season lightly with salt and freshly ground black pepper. This step enhances their flavor and helps them soften beautifully during baking.
The Hearty Chili Filling – Flavor at its Core
The star of the show, the chili filling, is robust, savory, and wonderfully spiced. The beauty of this recipe lies in its adaptability, but here's a fantastic starting point for robust flavor and satisfying texture.
- Brown the Meat: In a large skillet or Dutch oven, brown 1.5 lbs ground beef (80/20 or 85/15 recommended) over medium-high heat. Break it up with a spoon as it cooks. Once no longer pink, drain off any excess grease. For a lighter option, you can substitute ground turkey, chicken, or pork. To make this a vegetarian chili stuffed peppers recipe, use a plant-based crumble instead of meat.
- Sauté Aromatics: Reduce the heat to medium. Add 1 large yellow onion, chopped (about 1.5 cups), to the skillet and cook until softened, about 5-7 minutes. Stir in 2-3 cloves garlic, minced (about 1 tablespoon), and cook for another minute until fragrant. If you like, add 1 red or green bell pepper, chopped, and/or 1 jalapeño, minced (remove seeds and membranes for less spice) for extra vegetables and a kick.
- Spice it Up: This is where the chili truly comes alive! Stir in 2 tablespoons chili powder (use a good quality one for best flavor), 1 tablespoon ground cumin for earthy depth, 1 teaspoon smoked paprika for a lovely smoky undertone, and 1 teaspoon dried oregano, a classic chili herb. If you desire more heat, add 1/2 teaspoon cayenne pepper (start with less if you’re sensitive). Season with 1 teaspoon salt (or to taste) and 1/2 teaspoon freshly ground black pepper (or to taste). Cook the spices for about 1-2 minutes, stirring constantly, to toast them and deepen their flavor.
- Simmer the Sauce: Pour in 1 (28-ounce) can crushed tomatoes. Stir everything together, bring to a gentle simmer, then reduce heat to low, cover, and let it cook for at least 15-20 minutes, allowing the flavors to meld. If you want to make it a black bean chili, stir in a can of drained and rinsed black beans during the last 5 minutes of simmering. This is also a fantastic way to Transform Leftover Chili into Hearty Stuffed Peppers if you happen to have some on hand!
Assembling and Baking Your Masterpiece
Once your chili is ready, the final steps are quick and rewarding.
- Stuff the Peppers: Spoon the warm chili filling generously into each bell pepper half. Don't be shy – pack them full!
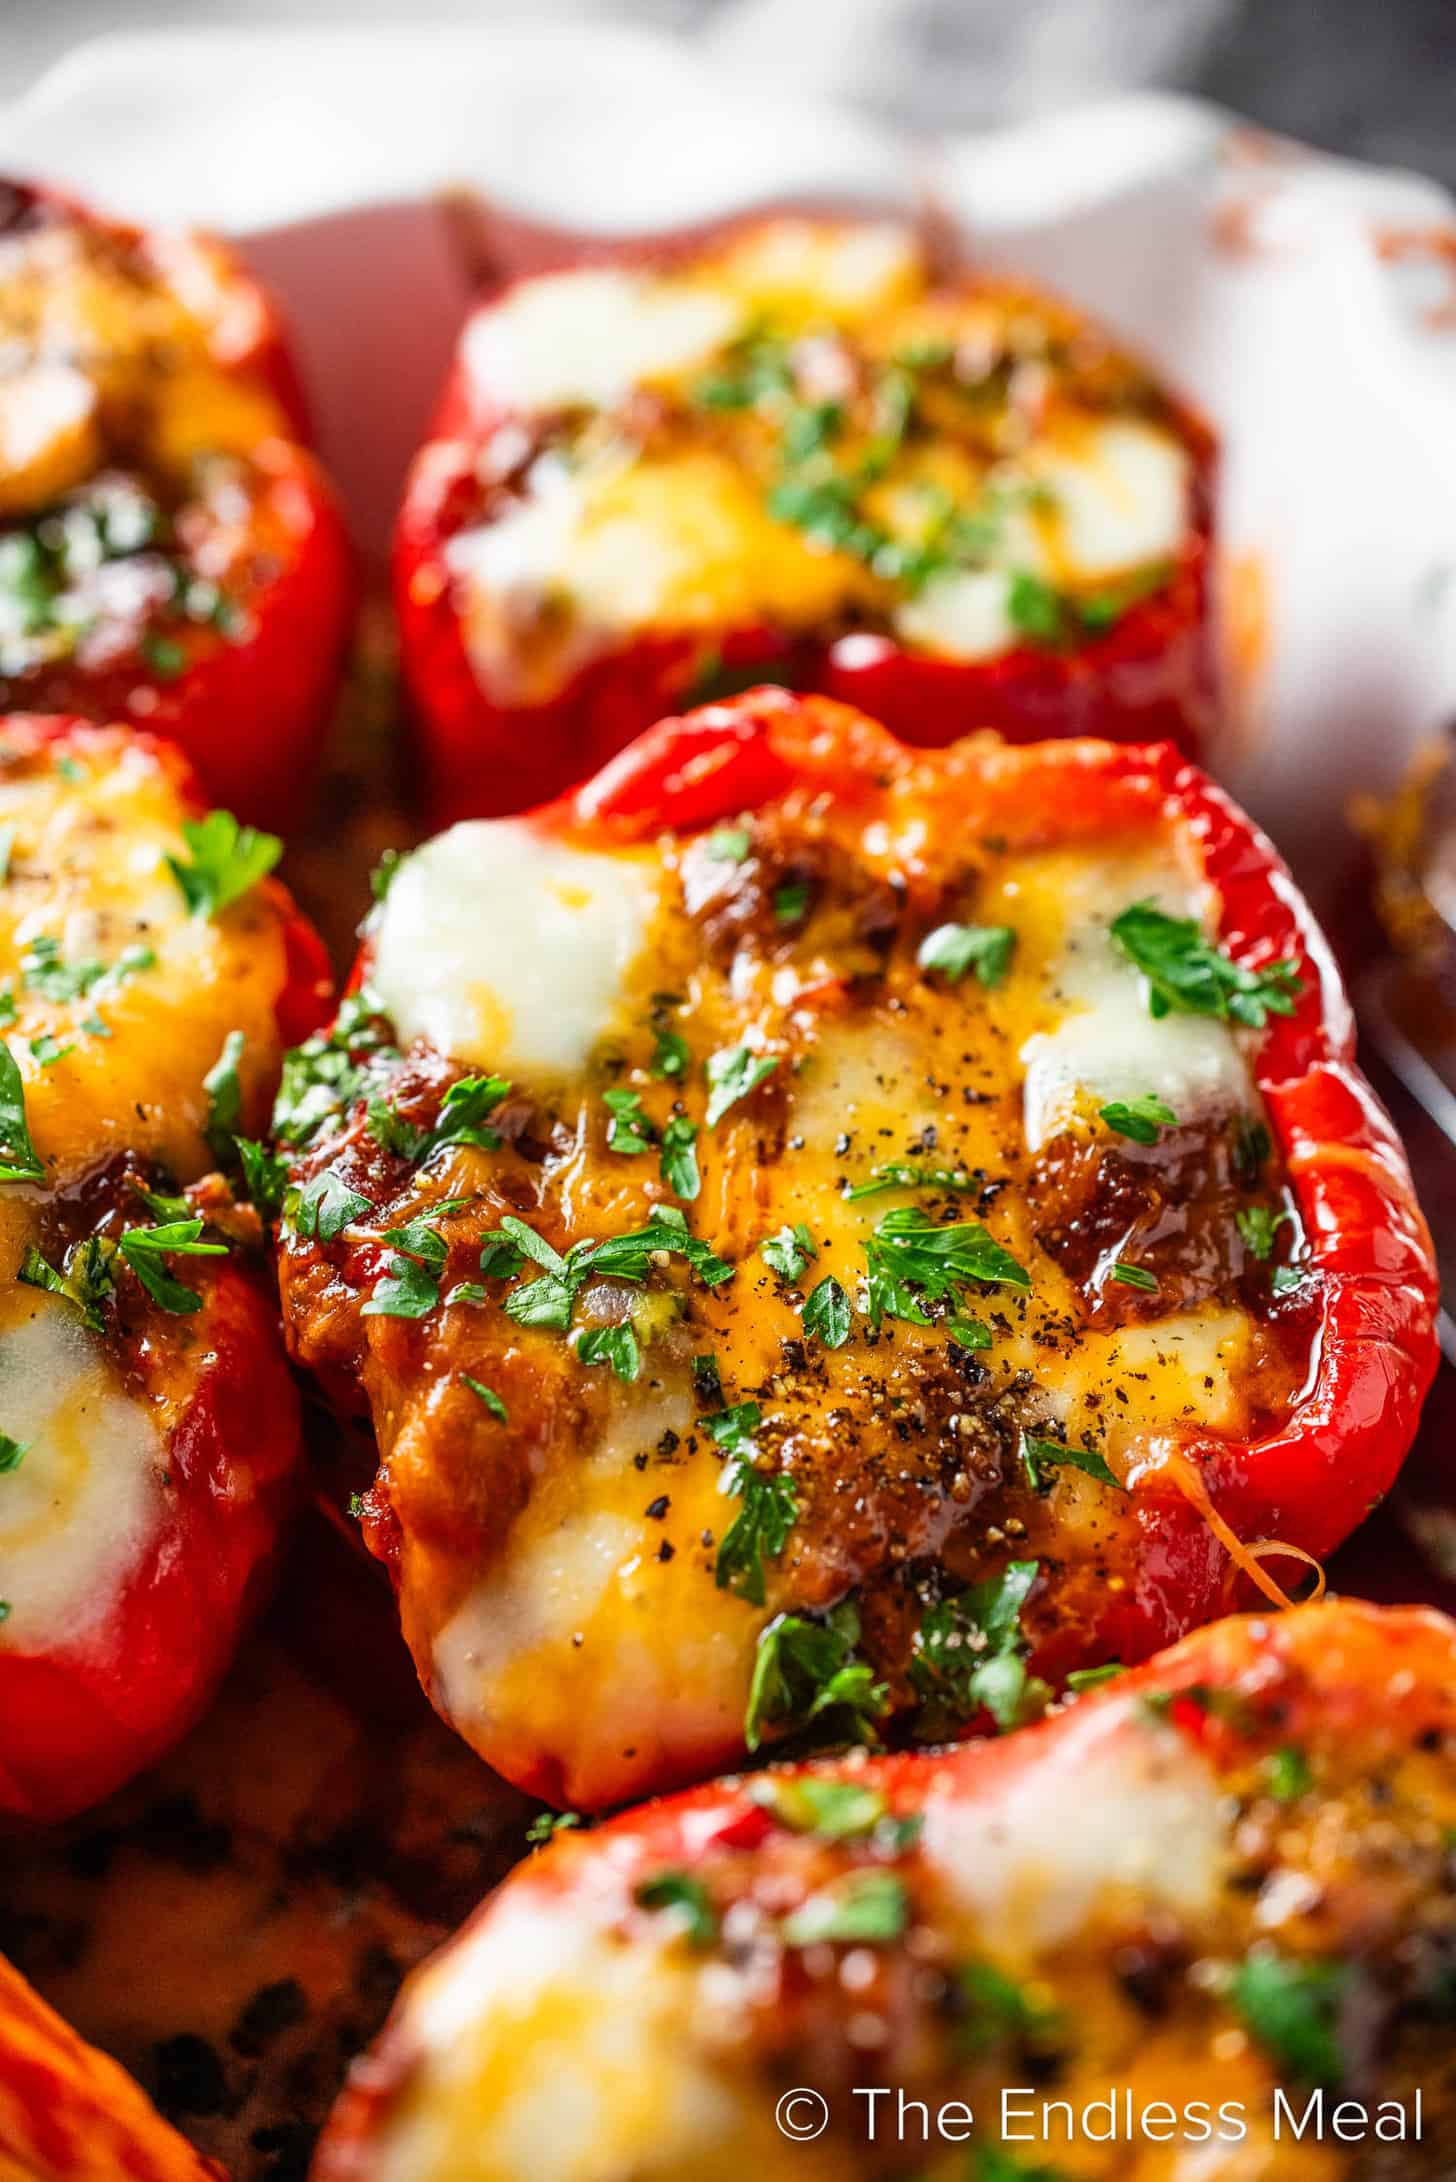
- Cheese Please: Top each stuffed pepper with a generous sprinkle of your favorite shredded cheese. Cheddar, Monterey Jack, or a Mexican blend work beautifully, melting into a golden, bubbly crown.
- Bake: Cover the baking dish loosely with foil and bake in a preheated oven at 375°F (190°C) for 30-35 minutes, or until the peppers are tender. Remove the foil for the last 10 minutes to allow the cheese to brown and become bubbly.
- Serve: Let the peppers rest for a few minutes before serving. Garnish with fresh cilantro, a dollop of sour cream, or a sprinkle of green onions if desired.
Make-Ahead & Freezer-Friendly: Smart Strategies for Busy Lives
One of the greatest advantages of this chili stuffed peppers recipe is its incredible flexibility for meal prepping. Whether you're making dinner for tonight or planning for weeks ahead, these tips will save you time and effort.
Make-Ahead Tips (Refrigeration)
- Chili Filling: Prepare the chili filling completely and store it in an airtight container in the refrigerator for up to 3-4 days. When ready to assemble, simply reheat the chili slightly before stuffing the peppers.
- Pre-Prepped Peppers: Wash, halve, and de-seed your bell peppers up to 2 days in advance. Store them in an airtight container or zip-top bag in the refrigerator.
- Fully Assembled (Unbaked): You can assemble the entire dish, stuffing the peppers and topping with cheese, up to 24 hours before baking. Cover the baking dish tightly with plastic wrap and refrigerate. When ready to bake, add an extra 10-15 minutes to the baking time since the dish will be cold.
Freezer-Friendly Tips (Long-Term Storage)
These chili stuffed peppers freeze beautifully, providing a convenient solution for busy weeknights or unexpected guests.
- Option 1: Freeze Unbaked: This is often the preferred method for optimal freshness and texture.
- Prepare and stuff the peppers as directed, but do not bake.
- Arrange the unbaked, stuffed peppers (without cheese) on a baking sheet and flash freeze for 1-2 hours until solid. This prevents them from sticking together.
- Once frozen, transfer the individual peppers to freezer-safe bags or containers. Label with the date. They will keep well for up to 3 months.
- To Bake from Frozen: Transfer frozen peppers to a baking dish. Top with cheese. Cover with foil and bake at 375°F (190°C) for 60-75 minutes, or until heated through and peppers are tender. Remove foil for the last 15-20 minutes to brown the cheese.
- Option 2: Freeze Baked: If you prefer to have fully cooked meals ready to reheat.
- Bake the chili stuffed peppers as per the recipe instructions. Allow them to cool completely.
- Wrap individual peppers tightly in plastic wrap, then aluminum foil, or place in freezer-safe containers. Label and freeze for up to 2-3 months.
- To Reheat from Frozen: Unwrap and place in a microwave-safe dish (microwave for 5-7 minutes per pepper) or bake in a preheated oven at 350°F (175°C) for 30-40 minutes, until heated through.
Tips for Perfection and Customization
- Vary the Meat: While ground beef is classic, feel free to use ground turkey, chicken, or even a mix of ground pork and beef for different flavor profiles.
- Go Vegetarian: Replace the meat with extra beans (black beans, kidney beans), corn, or a plant-based ground crumble for a delicious meatless version.
- Spice Level: Adjust the amount of jalapeño and cayenne pepper to suit your family’s preference for heat. For a milder chili, omit them entirely.
- Cheese Choices: Experiment with different cheeses! A sharp cheddar offers tang, Monterey Jack melts beautifully, and pepper jack adds a subtle kick.
- Add Grains: For an even heartier filling, stir in cooked rice or quinoa with the chili before stuffing the peppers.
- Serving Suggestions: Elevate your meal with toppings like fresh cilantro, sliced green onions, a dollop of sour cream or Greek yogurt, or a dash of your favorite hot sauce. A simple side salad or crusty bread completes the meal.
This chili stuffed peppers recipe is more than just a meal; it’s a testament to the joy of homemade food, offering both incredible taste and smart kitchen efficiency. With its vibrant flavors, hearty ingredients, and fantastic make-ahead and freezer-friendly properties, it's destined to become a beloved staple in your home. So go ahead, gather your ingredients, and prepare to delight your family and yourself with these truly delicious and versatile chili stuffed peppers!
